Real-Time Tracking
Monitor stock levels across all fulfillment locations in real-time with automatic updates from sales channels.
Esta página aún no está disponible en tu idioma.
Inventory management helps you track product stock levels, monitor inventory health, and make informed decisions about your business. The Inventory view provides a complete picture of all your products across multiple fulfillment locations.

OmniOrders Inventory Management gives you real-time stock visibility across all locations with automatic updates from sales channels. Search, filter, and bulk-edit SKUs; monitor low-stock alerts; manage tags and channels; and view full product history — all from one centralized dashboard.
Monitor stock levels across all fulfillment locations in real-time with automatic updates from sales channels.
Get instant visibility into out-of-stock items, low stock warnings, and overstocked products.
Track inventory across multiple warehouses and fulfillment locations from a single dashboard.
Update quantities, assign locations, and manage tags for multiple products at once.

When you open the Inventory view, you’ll see key metrics at the top:
These metrics help you quickly assess your inventory health and identify issues that need attention.
Access the Inventory Page
Click Inventory in the sidebar menu to view all your products.
Review Product Information
The inventory table shows:
Check Stock Levels
Each product row displays:
Identify Stock Issues
Look for alert indicators:
Use the search field in the Product column to find specific items:
Use the status dropdown to filter products:
Click the location filter to view inventory at specific fulfillment locations:
Search for products from specific brands or suppliers:
Find products with specific tags:
Click Any Product Row
Click anywhere on a product row to open the inventory sidebar.
View Inventory Tab
The Inventory tab shows:
Check Forecast Tab
The Forecast tab displays:
Close the Sidebar
Click the X button or outside the sidebar to close it.
To edit a product’s details:
To see inventory changes over time:
Select Individual Products
Check the checkbox next to each product you want to modify.
Select All Products
Check the checkbox in the table header to select all products on the current page.
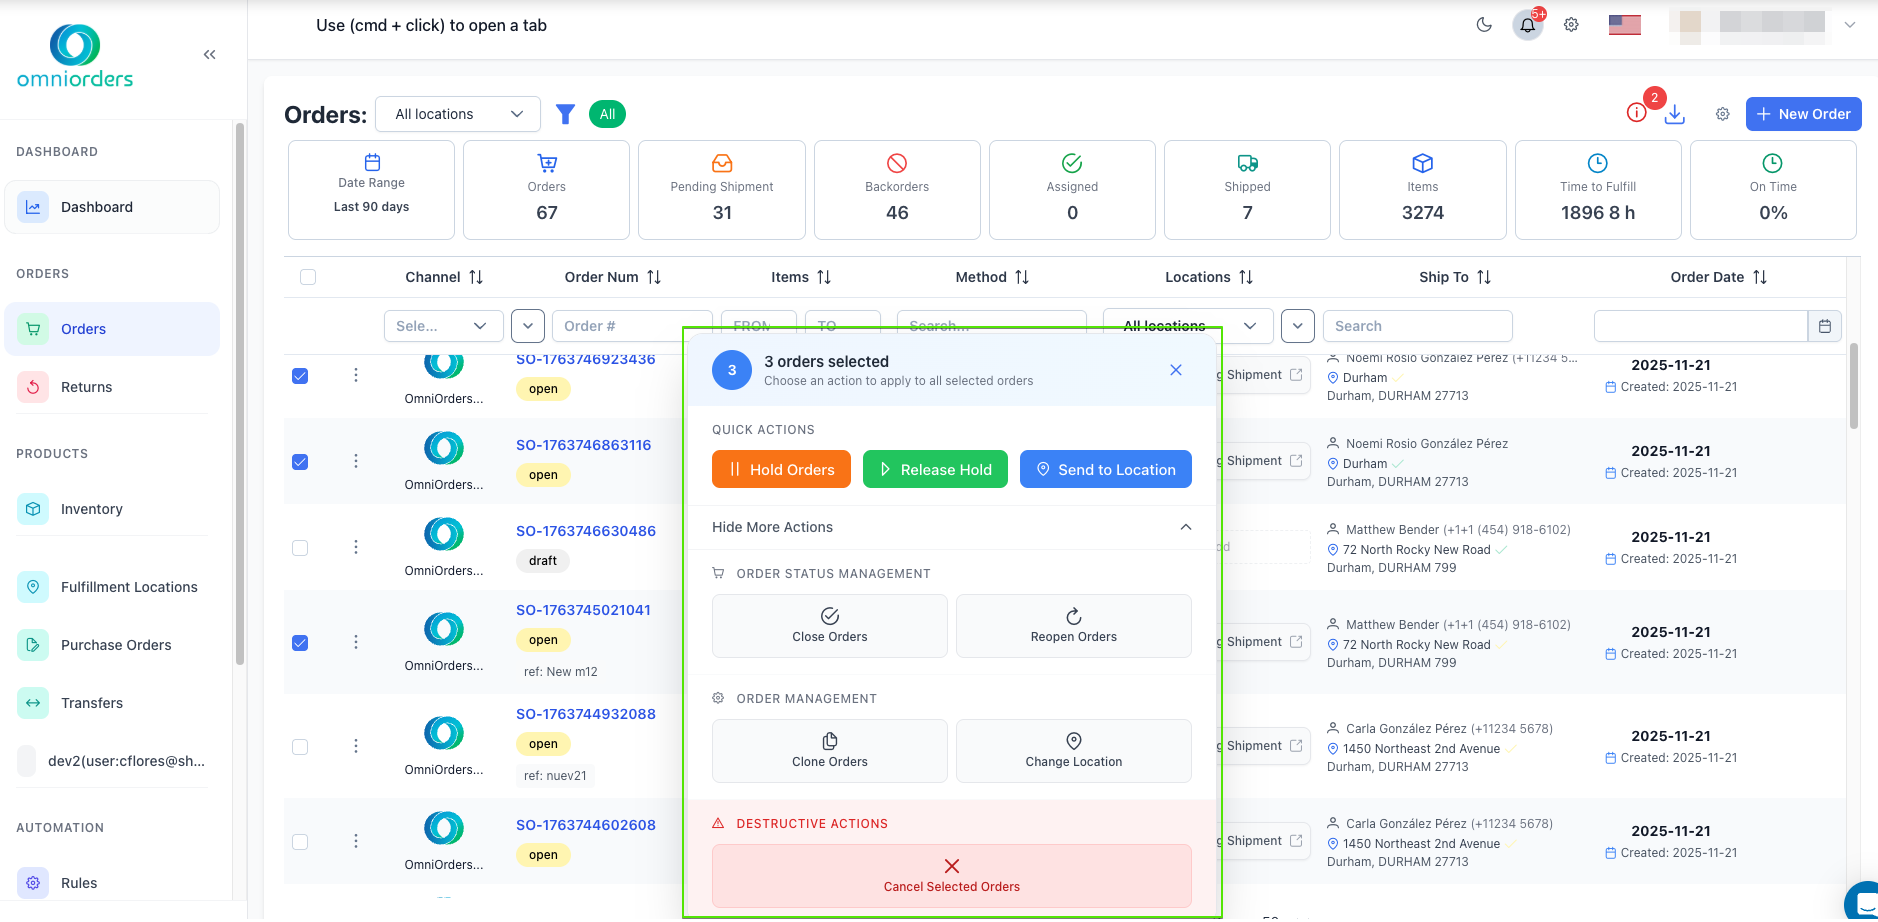
Review Selection Count
The bulk action toolbar appears at the bottom showing the number of selected items.
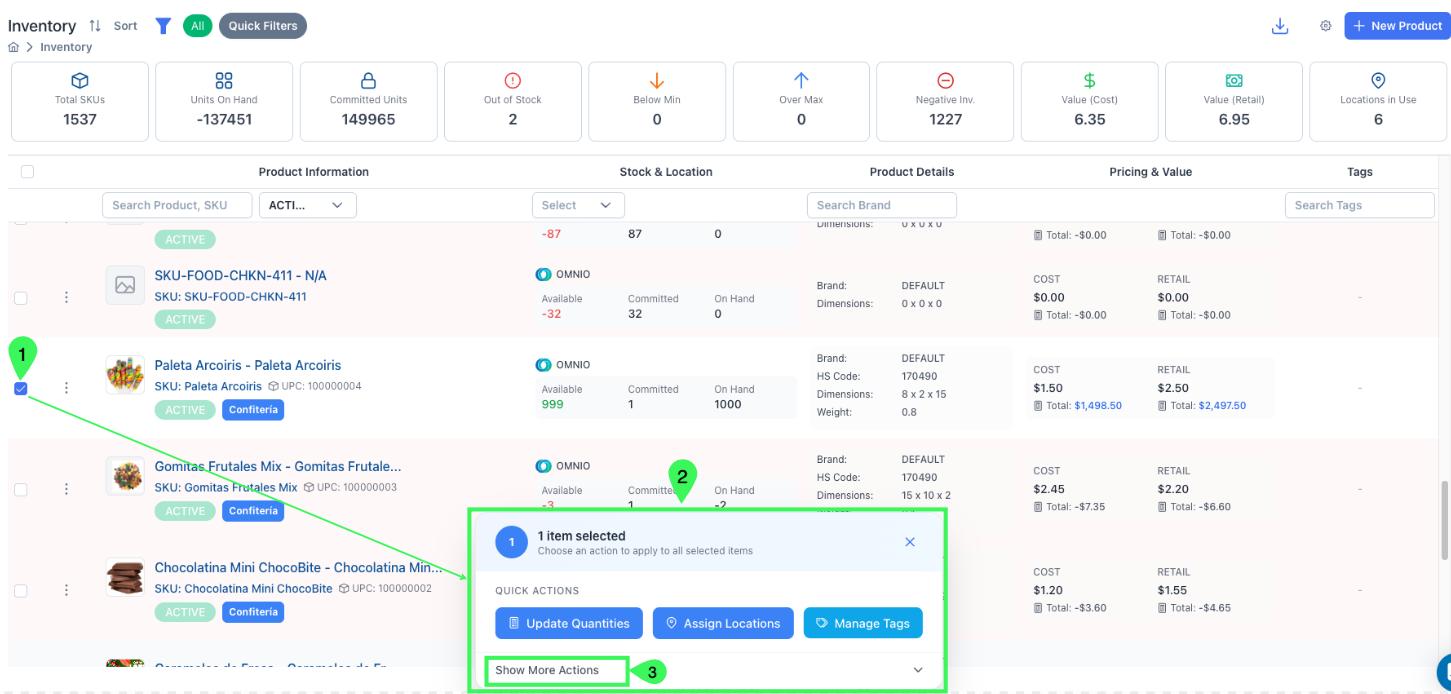
The bulk action toolbar provides quick access to common operations. Click Show More Actions to see all available bulk operations organized by category:
To update stock levels for multiple products:
Select Products
Choose the products you want to update.
Click Update Quantities
Click the Update Quantities button in the bulk action toolbar.
Choose Update Type
Select how to update quantities:
Select Location
Choose which fulfillment location to update.
Enter Quantity
Type the quantity value to apply.
Apply Changes
Click Submit to update all selected products.
To manage which locations carry your products:
Select Products
Choose the products to modify.
Click Assign Locations
Click the Assign Locations button in the bulk toolbar.
Choose Action
Select either:
Select Locations
Check the fulfillment locations to modify.
Apply Changes
Click Submit to update product locations.
To manage which sales channels display your products:
Select Products
Choose the products to modify.
Click Assign/Remove Channels
Click the Assign/Remove Channels button in the bulk toolbar.
Choose Action
Select either:
Select Channels
Check the sales channels to modify.
Apply Changes
Click Submit to update channel assignments.
To add or remove tags from multiple products:
Select Products
Choose the products to tag.
Click Manage Tags
Click the Manage Tags button in the bulk toolbar.
Choose Action
Select either:
Select Tags
Check the tags to add or remove, or create new tags.
Apply Changes
Click Submit to update product tags.
To change other product fields in bulk:
Select Products
Choose the products to modify.
Click Update Any Field
Click the Update Any Field button in the bulk toolbar.
Choose Field
Select which product field to update (status, brand, supplier, etc.).
Enter New Value
Type or select the new value for that field.
Apply Changes
Click Submit to update all selected products.
To export product data:
To remove products from your inventory:
Select Products
Choose the products to delete.
Click Delete
Click Show More Actions in the bulk toolbar, then click Delete Selected Items.
Confirm Deletion
Review the warning message and type “DELETE” to confirm.
Complete Deletion
Click Confirm to permanently delete the products.
Quick filters help you find common inventory issues:
Click the Quick Filters dropdown in the toolbar to apply these filters instantly.
Click any column header to sort by that field:
Click the column header again to reverse the sort order.
To show or hide table columns:
Your column preferences are saved automatically for future sessions.
Configure minimum and maximum stock levels for each product to receive automatic alerts when inventory needs attention.
Apply tags to group similar products, seasonal items, or products needing special attention for easier filtering and management.
Review your inventory weekly to identify slow-moving items, stock issues, and reorder needs.
If you have multiple fulfillment locations, regularly check stock distribution to ensure optimal inventory placement.
Export inventory data regularly for external analysis, accounting, or backup purposes.
Address red and orange alerts promptly to avoid stockouts and customer disappointment.
If you don’t see products in your inventory:
If quantities aren’t updating:
If you can’t change stock levels:
If products show negative quantities:
If search isn’t working:
Need More Help? Contact OmniOrders support at [email protected]
Next Steps: Stock Management | Locations & Warehouses | Stock Adjustments