Offline Sales
Process phone orders, walk-in purchases, trade show sales, or any orders that don’t come through automated channels.
Esta página aún no está disponible en tu idioma.
Creating orders manually lets you add orders from phone calls, walk-in customers, or any offline sales channel directly into OmniOrders. Every order enters the same fulfillment pipeline whether it comes from an integration or manual entry.
Manual order creation lets you process sales that originate outside your integrated channels — phone orders, walk-in purchases, trade show sales, or B2B transactions. You control every detail: pricing, shipping method, fulfillment location, and whether to save as a draft or process the order immediately.
Process phone orders, walk-in purchases, trade show sales, or any orders that don’t come through automated channels.
Set pricing, shipping methods, fulfillment locations, special dates, and custom instructions for each order.
Add orders from sales channels without direct integrations or during integration downtime.
Save incomplete orders as drafts to finish later, perfect for quotes or orders pending payment approval.
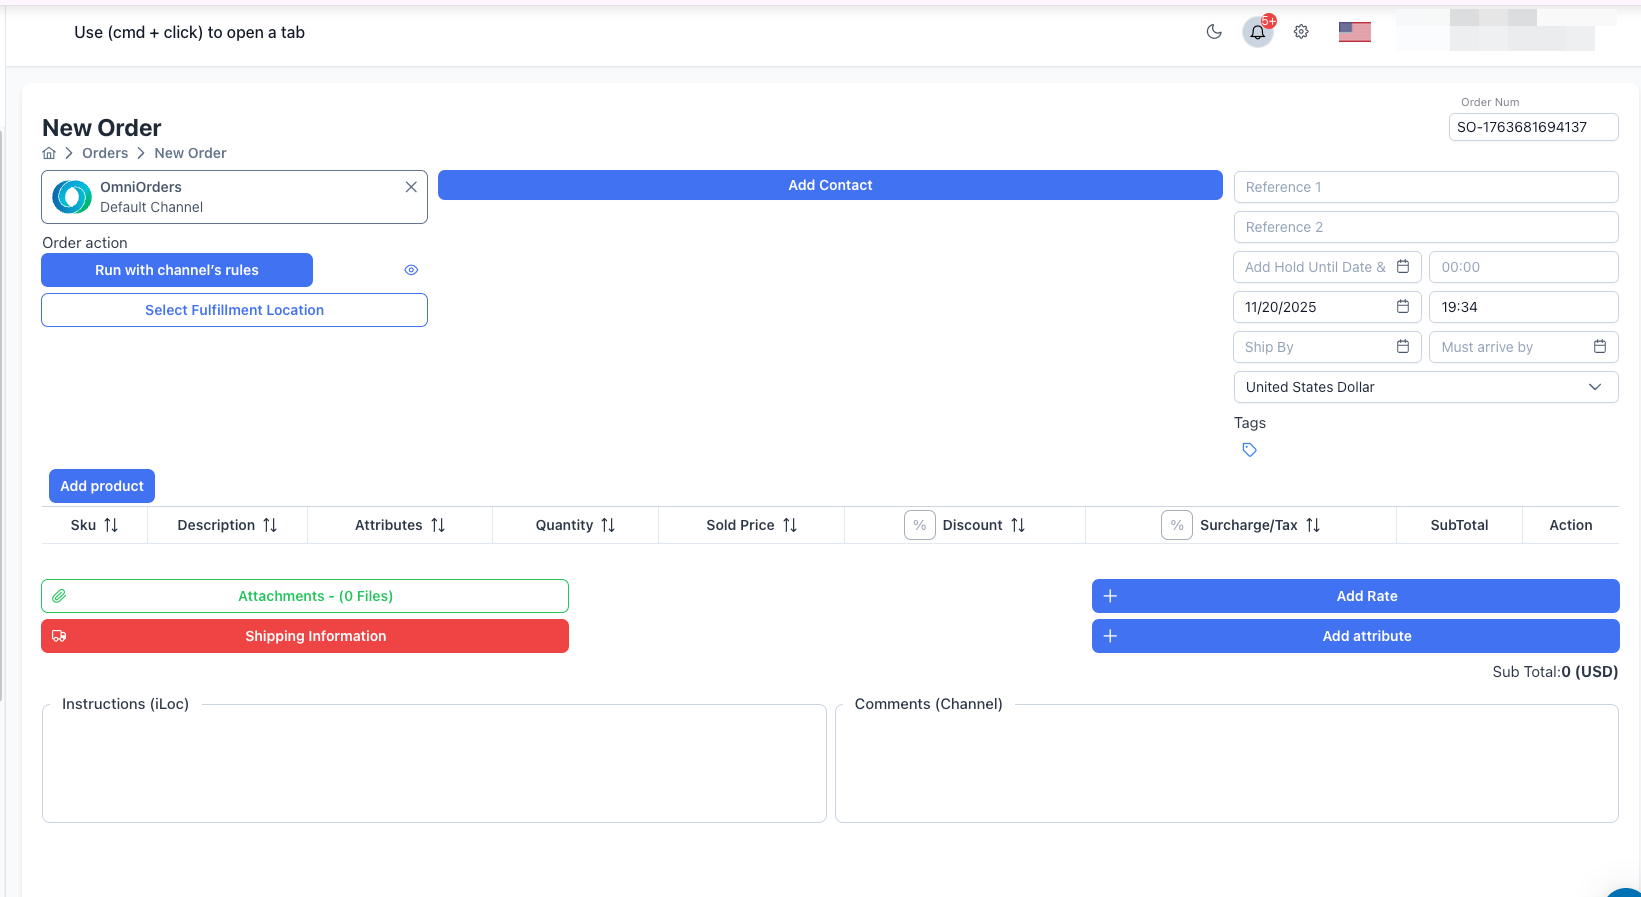
Open the Create Order Form
Click Orders in the main navigation, then click the New Order button in the top right corner.
Set Order Number
The system auto-generates an order number with format SO-[timestamp]. You can edit this to match your own numbering system or leave it as-is.
Select Channel
Choose which sales channel this order belongs to:
The channel determines which automation rules apply to routing and processing.
Choose Fulfillment Method
Decide how to route this order:
Option 1: Run with channel’s rules (Recommended)
Option 2: Select Fulfillment Location (Manual)
Add Customer Contact
Click Add Contact to either:
Required customer information:
Add Shipping and Billing Addresses
After selecting a contact, fill in address details:
Shipping Address (Required):
Billing Address (Optional):
Set Order Details
Fill in additional order information:
Reference Numbers:
Important Dates:
Order Settings:
Add Products to Order
In the Product Data Table section, click Add Product:
For each product line, configure:
The SubTotal column calculates automatically: (Quantity × Sold Price - Discount + Tax)
Total Order Value appears at the bottom of the product table.
Add Shipping Information (Optional)
Choose shipping details:
Option 1: Manual Entry
Option 2: Get Live Rates
Add Additional Details (Optional)
Enhance your order with optional information:
Attached Files:
Custom Rates:
Order Attributes:
Special Instructions:
Save the Order
Click Save Order button at the bottom. A dialog appears with two options:
Save as draft
Continue
| Field | Description | Validation |
|---|---|---|
| Channel | Sales channel source | Must be selected |
| Customer Contact | Name, email, phone | All contact fields required |
| Shipping Address | Complete delivery address | Address1, City, Postal Code, Country required |
| Products | Order line items | At least one product with valid quantity |
| Order Date | Order placement date | Cannot be empty |
| Currency | Pricing currency | Defaults to account currency |
| Field | Description | Use Case |
|---|---|---|
| Order Number | Custom identifier | Match your numbering system |
| Reference 1 & 2 | External references | PO numbers, tracking IDs |
| Ship By | Target ship date | Priority or time-sensitive orders |
| Must Arrive By | Delivery deadline | Guaranteed delivery dates |
| Hold Until | Delay processing | Pre-orders, future fulfillment |
| Billing Address | Invoice address | When different from shipping |
| Tags | Categorization | Campaign, source, priority |
| Shipping Info | Carrier & method | Override automation |
| Instructions | Fulfillment notes | Gift wrap, special handling |
| Comments | Channel notes | Customer requests |
| Attached Files | Documents | Invoices, labels, customs forms |
| Rates | Custom charges | Handling fees, insurance |
| Attributes | Metadata | Custom tracking fields |
Each product in the order has these configurable fields:
| Field | Description | Notes |
|---|---|---|
| SKU | Product identifier | From product catalog |
| Description | Product name | Auto-filled |
| Quantity | Units ordered | Must be > 0 |
| Sold Price | Price per unit | Can override catalog price |
| Discount | Reduction amount or % | Toggle between fixed and percentage |
| Surcharge/Tax | Additional charges | Toggle between fixed and percentage |
| SubTotal | Line total | Calculated: (Qty × Price - Discount + Tax) |
| Attributes | Line metadata | Product-specific custom data |
When you save an order, it enters the order lifecycle based on your choice:
Order Status: Draft
Characteristics:
Use For:
To Process Later:
Order Status: Open → eventually → Closed
Shipment Status: Routing → Assigned → Shipped
Characteristics:
Order Lifecycle:
Search Methods:
Product Info Displayed:
You can add multiple products at once:
After Adding:
Always select existing customers when possible to avoid duplicate records. Verify address accuracy to prevent shipping errors and delivery delays.
Enter the actual order date (when customer placed it), not the date you’re entering it. This keeps your reporting and analytics accurate.
Fill in Reference 1 and Reference 2 to link orders to external systems, PO numbers, or other identifiers for easier tracking and reconciliation.
Create a tagging strategy (campaign, source, priority, etc.) and apply tags consistently. This makes filtering and reporting much easier later.
Review products, quantities, pricing, and shipping address before clicking “Continue”. Use “Save as draft” if you need more time to verify details.
Use the Instructions field to communicate gift wrapping, custom packaging, fragile handling, or other special requirements to your warehouse team.
Problem: Trying to add products or select fulfillment location before choosing a channel.
Solution: Select a channel from the Channel dropdown at the top of the form first. All other fields become available after channel selection.
Problem: Missing required customer fields.
Solution:
Problem: Attempting to save order with missing required fields.
Solution: Check for these common issues:
Fields with errors display red validation messages.
Problem: Cannot find product when clicking “Add Product”.
Solution:
Problem: Shipping carrier or method missing.
Solution:
Note: Shipping information is optional for draft orders but may be required by some fulfillment locations.
Problem: Some fields are locked or read-only after processing.
Solution: This is expected behavior. Once an order is processed (not draft), certain fields lock to maintain data integrity. Create a new order or contact support if major changes are needed.
Problem: Order assigned to unexpected fulfillment location.
Solution:
Draft orders appear in the orders list with Draft status:
Orders saved with “Continue” move through fulfillment:
Now that you’ve created an order, explore these features: