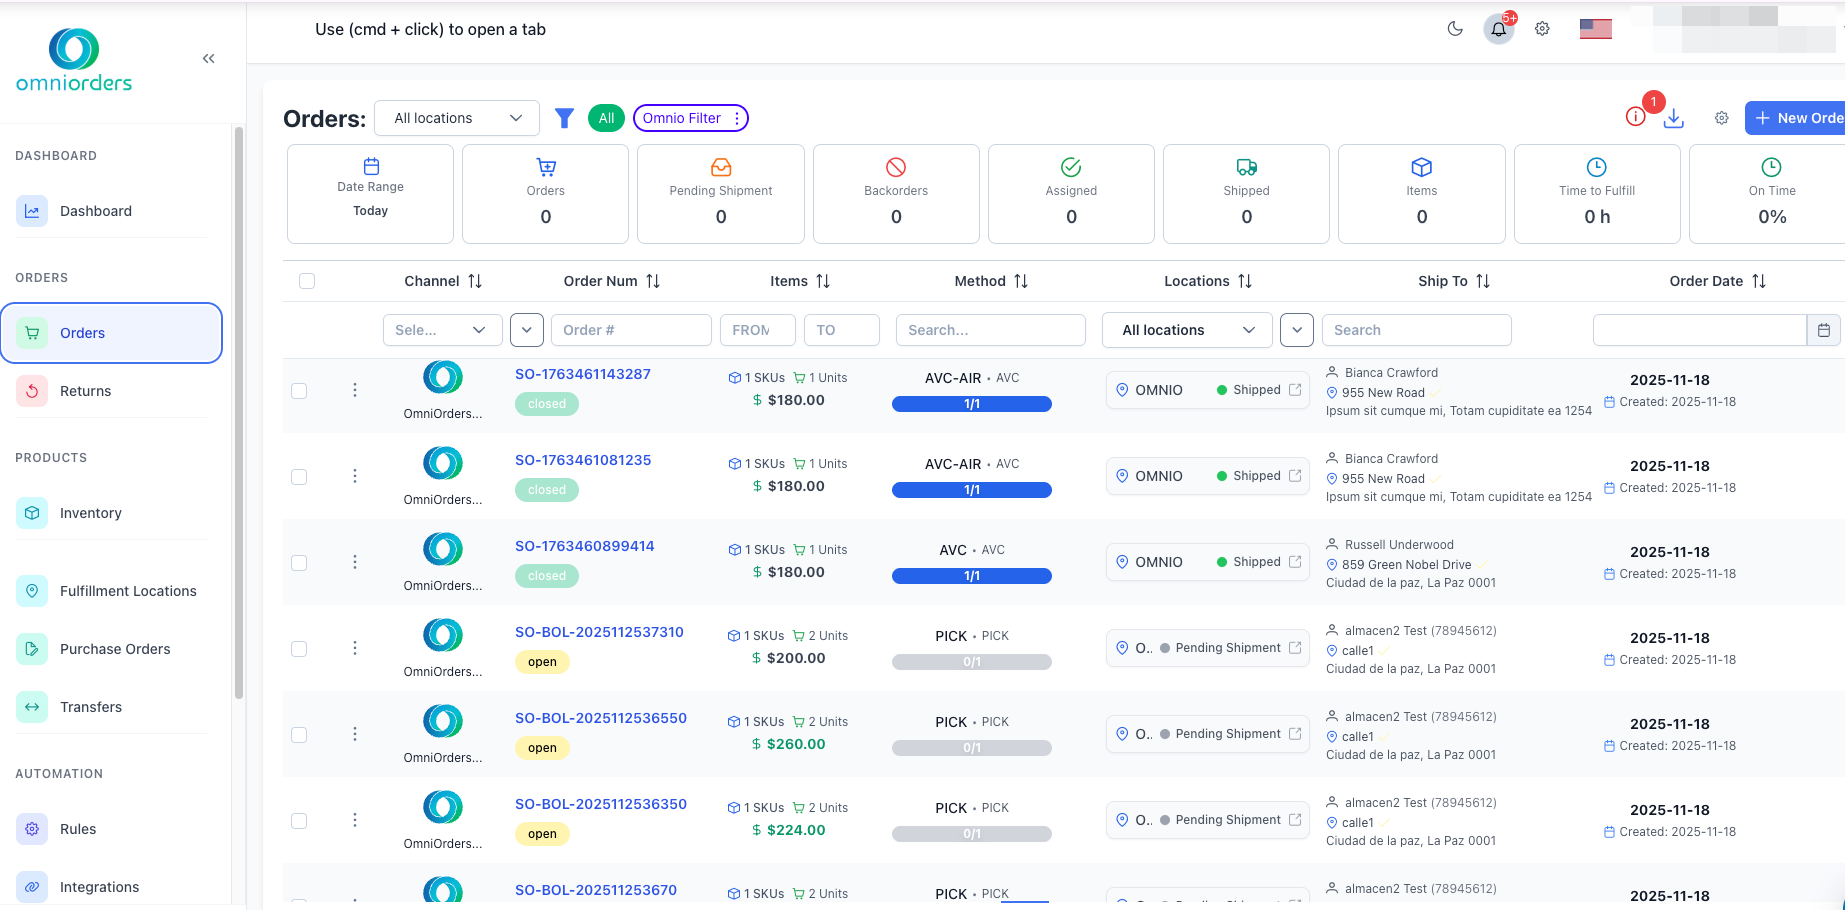
Real-Time Metrics
Monitor live order counts, shipment status, and fulfillment times at a glance. Track key performance indicators like pending shipments, backorders, and on-time delivery percentage.
Esta página aún no está disponible en tu idioma.
The Orders Overview is your central hub for managing all customer orders in OmniOrders. This page provides a complete view of your order pipeline, from new orders to shipped packages, with real-time metrics and tools to find and process orders quickly.
The Orders Overview is your central hub for every customer order in OmniOrders. Monitor real-time metrics, filter by status or location, run bulk actions on multiple orders at once, and customize the columns you see — all from a single view. It’s the starting point for every daily order management workflow.
Monitor live order counts, shipment status, and fulfillment times at a glance. Track key performance indicators like pending shipments, backorders, and on-time delivery percentage.
Find orders instantly using location filters, saved filters, and advanced search criteria. Filter by status, date range, customer, shipping method, or any order field.
Select multiple orders and perform actions like hold, release, send to location, clone, or cancel all at once. Save time with efficient batch processing.
Choose which columns to display and reorder them to match your workflow. Your preferences are saved automatically and persist across sessions.
The top of the Orders Overview displays scrollable metric cards that update based on your selected date range. These metrics help you track order flow and fulfillment performance in real-time.

Click the Date Range card on the left to select a custom date range. All metrics update automatically to reflect the selected time period. Options include:
| Metric | What It Shows | Type | Icon |
|---|---|---|---|
| Orders | Total number of orders in the selected date range | Order Count | 🛒 |
| Pending Shipment | Orders awaiting shipment (Shipment Status: Routing, On Hold, Pending Shipment) | Shipment Status | 📥 |
| Backorders | Orders with items out of stock or unavailable (Shipment Status: Backorder) | Shipment Status | 🚫 |
| Assigned | Orders assigned to a fulfillment location (Shipment Status: Assigned) | Shipment Status | ✅ |
| Shipped | Orders that have been shipped to customers (Shipment Status: Shipped) | Shipment Status | 🚚 |
| Items | Total number of items across all orders (excludes cancelled orders) | Item Count | 📦 |
| Time to Fulfill | Average time to fulfill orders, displayed in hours | Performance | ⏰ |
| On Time | Percentage of orders shipped on time based on ship-by date | Performance | 🎯 |
Navigate to Orders
Click Orders in the main navigation menu under the “Orders” section. The Orders Overview page will load with your current orders.
View Dashboard Metrics
Review the metric cards at the top of the page. Scroll horizontally if needed to see all available metrics for your selected date range.
Filter by Location (Optional)
Use the All locations dropdown in the header to filter orders by specific fulfillment location. This is helpful when managing multiple warehouses.
Browse or Search Orders
Scroll through the order table, use column filters, or apply saved filters to find specific orders. Click any order number to view details in a side panel.
View all orders in a customizable data table with sorting, filtering, and inline actions. Click any order number to view detailed information in a side panel without leaving the page.
Create and save custom filter combinations for quick access to specific order segments. Apply saved filters with one click to view orders that match your criteria.
Choose which columns to display and reorder them by dragging. Available columns include Channel, Order Number, Items, Shipping Method, Locations, Ship To address, and Order Date.
Select multiple orders using checkboxes to perform bulk actions. A bulk action toolbar appears at the bottom when orders are selected.
Export orders to CSV for reporting or data analysis. Import orders from CSV files for bulk order creation from offline sources.
Filter orders by fulfillment location to focus on specific warehouse operations. Useful for multi-location businesses managing different fulfillment centers.
The order table displays key information for each order:
Each column header includes a filter row where you can:
Each order has a menu icon with available actions based on its current status. Common actions include viewing details, editing drafts, holding/releasing orders, and managing fulfillment locations.
When you select multiple orders using checkboxes, a bulk action toolbar appears at the bottom of the screen. You can hold, release, send to location, clone, close, reopen, or cancel multiple orders at once.
Filter orders by fulfillment location using the All locations dropdown in the header. This shows only orders assigned to specific warehouses or fulfillment centers.
To clear location filter:
Each column has an inline filter in the header row:
Click the bookmark icon in each filter field to save commonly used filter values for quick access.
Open Column Settings
Click the Settings button in the toolbar to open the column customization sidebar.
Show/Hide Columns
Toggle checkboxes next to column names to show or hide them in the order table. Commonly hidden columns can be enabled anytime.
Reorder Columns
Drag and drop columns in the list to change their order in the table. Arrange columns to match your workflow priorities.
Open Import Dialog
Click the menu icon in the Orders header and select “Upload by File (CSV)”.
Choose File
Select your CSV file containing order data. The file should match the OmniOrders format.
Review Import
The system validates your file and shows any errors that need correction.
Complete Import
Confirm to import the orders. You can check the Feed History to track import progress.
Select Orders (Optional)
To export specific orders, check their boxes first. Leave unselected to export all orders matching current filters.
Open Export Dialog
Click the menu icon in the Orders header and select “Export by File (CSV)”.
Choose Options
Select which order data fields to include in the export and any additional settings.
Download File
Click export to generate and download the CSV file.
Track all import and export operations by clicking “Feed History” from the menu icon. This shows:
Orders display status badges that show their current stage in the fulfillment process (Draft, Open, On Hold, Shipped, etc.). Each status determines which actions are available for that order.
Create saved filters for common order segments like “Today’s Orders,” “Pending Shipment,” or “On Hold.” This saves time and ensures consistency when reviewing orders daily.
Check the dashboard metrics each morning to understand your order pipeline. Pay special attention to pending shipments, backorders, and on-time percentage to identify bottlenecks early.
Hide columns you don’t use and arrange important columns first. A cleaner, focused view helps you work faster and spot issues more quickly. Each team member can customize their own view.
Double-check your selection before performing bulk actions, especially cancellations or location transfers. Use the preview to confirm which orders will be affected before proceeding.
If you manage multiple fulfillment locations, use the location filter to focus on one warehouse at a time. This helps reduce cognitive load and prevents mistakes when processing orders.
Click order numbers to view full details in the side panel before taking actions. Verify shipping address, items, and status to ensure accuracy before processing or shipping.
Problem: Orders are missing from the table or table is empty.
Solutions:
Problem: An action is disabled, greyed out, or doesn’t appear in the menu.
Solutions:
Problem: Bulk action doesn’t affect all selected orders or shows unexpected results.
Solutions:
Problem: Dashboard metrics show zero or don’t update after changing date range.
Solutions:
Problem: Column filters don’t filter orders or show unexpected results.
Solutions:
Now that you understand the Orders Overview, explore these related features: