Managing products in OmniOrders lets you create and organize your product catalog with full control over variants, pricing, images, and inventory details. Whether you’re selling simple products or complex items with multiple variants, OmniOrders provides flexible tools to manage your entire catalog.
Start with a single SKU product to get familiar with the form, then enable multiple variants when you need size, color, or other options.
OmniOrders is the central catalog for all your products — whether single SKUs or multi-variant items with sizes, colors, and styles. Create, edit, and organize products with rich descriptions, images, categories, supplier links, and barcodes, then sync them across all connected sales channels automatically.
Create simple products or complex items with multiple variants (sizes, colors, styles) all from one form.
Add detailed descriptions with rich text formatting, images, categories, and supplier information.
Manage all product information in one place - sync automatically to connected sales channels.
Set cost, wholesale, and retail prices for each SKU with support for multiple price points.
Navigate to Inventory
Click Inventory in the left sidebar under the Products section.
Click New Product
In the top-right corner, click the New Product button. The product creation form opens.
Fill General Information
Enter the product details:
Product Name : The main product name (required)Description : Detailed product description with rich text formatting (optional)
Choose SKU Configuration
Decide if your product has variants:
Single SKU : One version of the product (e.g., “Basic T-Shirt”)Multiple SKUs : Product has variants like sizes or colors (e.g., “T-Shirt - Small/Blue”)
Toggle “This product has various SKUs” to enable multiple variants.
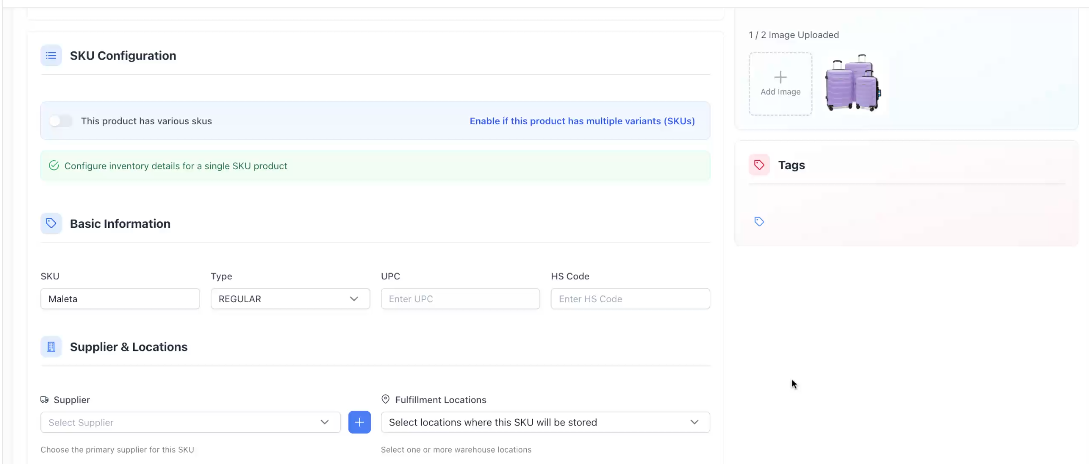
Configure SKU Details
For each SKU, provide:
SKU Code : Unique identifierUPC/Barcode : Product barcode (optional)Dimensions : Weight, length, width, heightPricing : Cost price, wholesale price, retail priceLocations : Select fulfillment locations that will stock this SKUTags : Add tags for organization
Add Organization Details
In the right sidebar, configure:
Brand : Select or create a brandCategories : Assign product categoriesSupplier : Choose the primary supplier
Upload Product Images
Add product photos to help identify items:
Drag and drop images or click to browse
Upload multiple images
First image becomes the primary product image
Add Tags (Optional)
Tag products for easy filtering and organization (e.g., “seasonal”, “clearance”, “best-seller”).
Save Product
Click Save Product in the top-right corner. The product is created and appears in your inventory.
SKU Configuration Toggle:
Find the Product
Go to Inventory and locate the product you want to edit by searching or scrolling.
Open Product Editor
Click on the product row or click the edit icon to open the product editor.
Update General Information
Modify the product name or description as needed.
Manage SKUs
View all SKUs for the product. For each SKU you can:
Edit SKU details (pricing, dimensions, codes)
Add new SKUs (for products with variants)
Delete SKUs (if no longer needed)
Manage product options/variants
Update Organization & Images
Change brand, categories, supplier, images, or tags in the right sidebar.
Save Changes
Click Update Product to save your changes.
Use single SKU for products with no variants:
Examples:
Unique items (e.g., “Custom Artwork”)
Simple products (e.g., “Water Bottle”)
Items without size/color options
Configuration:
One SKU per product
Simplified form with all details in one place
Faster to create and manage
Use multiple SKUs for products with options:
Examples:
Clothing with sizes (S, M, L, XL)
Products with colors (Red, Blue, Green)
Items with multiple options (Size + Color combinations)
Configuration:
Create options (e.g., “Size”, “Color”)
Define values for each option (e.g., “S, M, L”)
System generates all combinations automatically
Configure pricing/details for each variant
The main product details that appear across all SKUs:
Product Name : Required field, appears in inventory lists and channelsDescription : Rich text editor for detailed product information with formatting
Configure inventory details for each SKU:
Basic Details:
SKU Code : Unique identifier for this variantUPC/Barcode : Product barcode for scanningType : SKU classification
Physical Properties:
Weight : Product weight (used for shipping calculations)Dimensions : Length, width, height (for shipping and storage)Harmonization Code : Customs/duty code for international shipping
Pricing:
Cost Price : Your purchase cost from supplierWholesale Price : Price for bulk/wholesale customersRetail Price : Price for individual customers
Supplier & Locations:
Supplier : Choose the primary supplier for this SKUFulfillment Locations : Select one or more warehouse locations where this SKU will be storedMultiple locations can be assigned per SKU
Organize products for easy filtering and reporting:
Type Product:
Select the product type classification
Category:
Assign one or more categories
Create hierarchical category structures
Categories sync to connected sales channels
Brand:
Select existing brand or create new
Click + to add a new brand
Brands help organize products by manufacturer or product line
UOM (Unit of Measure):
Select the unit of measure for this product
Add visual references for your products:
Upload Multiple Images : Drag and drop or browse for filesPrimary Image : First image uploaded becomes the primaryReorder Images : Drag to change image orderDelete Images : Click × to remove imagesMaximum Images : System limits total images per product
Organize and filter products using custom tags:
Add Tags : Type tag name and press EnterRemove Tags : Click × on any tagExisting Tags : Select from previously created tagsCommon Uses : Season, promotion, category, status
Example Tags:
seasonalclearancebest-sellernew-arrivaldiscontinued
For multi-SKU products, options define how variants differ:
Enable Multiple SKUs
Toggle “This product has various SKUs” in SKU Configuration.
Click Add Option
In edit mode, click Add Option in the Product SKUs section.
Select Option Type
Choose from predefined options (Size, Color, Material, etc.) or create custom.
Assign Values to SKUs
For each SKU, enter the option value (e.g., “Small”, “Medium”, “Large”).
Save Option
Click Save to add the option to all SKUs.
Click Edit next to any option to modify values
Update option values for specific SKUs
Changes sync to all connected sales channels
Click Delete next to an option and confirm to remove it.
Create meaningful SKU codes that include product info (e.g., “TSHIRT-BLU-M” for Blue T-Shirt Medium). Easier to find and manage.
Upload clear product photos. First image appears in inventory lists, so make it count. Multiple angles help warehouse staff.
Always enter cost, wholesale, and retail prices. Accurate pricing helps with profit calculations and reporting.
Use consistent tags across products. Create a tagging strategy (e.g., season, category, status) and stick to it.
Select fulfillment locations when creating products. Easier than updating later when orders start coming in.
Only use multiple SKUs when truly needed. Simple products are easier to manage. Reserve variants for size/color differences.
To create similar products faster:
Create the first product with all details
Copy the SKU code, pricing, and settings
Create a new product and paste/modify the details
Adjust name, images, and specific differences
When editing multi-SKU products:
Select multiple SKUs using checkboxes
Click Apply to Selected SKUs
Update fields you want to change (pricing, locations, tags)
Changes apply to all selected SKUs at once
Adding Images:
Drag multiple images at once for faster upload
Images upload in order dropped
Reordering Images:
Drag and drop images to reorder
First image is primary in inventory lists
Deleting Images:
Click × on any image to remove
Confirm deletion when prompted
Problem : Error message when saving: “SKU code already exists”
Solution :
Check if you already created this SKU
Search inventory for the duplicate SKU code
Either use a different SKU code or edit the existing product
Problem : Can’t save product, no clear error shown
Solution :
Check Product Name is filled in (required)
For single SKU: Ensure SKU Code is entered
For multiple SKUs: Generate variants before saving
Look for red text indicating validation errors
Problem : Multiple SKUs enabled but no variants created
Solution :
Go to Options section in edit mode
Add at least one option with values
System automatically generates SKU combinations
Fill in remaining details for each generated SKU
Problem : Images won’t upload or show error
Solution :
Check file size (large images may fail)
Ensure file format is supported (JPG, PNG, WebP)
Check you haven’t reached maximum images limit
Try uploading one image at a time
Problem : Changing supplier updated all SKUs unexpectedly
Solution :
This is intentional behavior. Supplier is set at product level and applies to all SKUs. If SKUs have different suppliers, create separate products.
Product Name : Must be unique and descriptiveSKU Code : Each SKU needs a unique code (for single SKU products)
Description : Helps warehouse staff and customers understand the productBrand : Makes filtering and organizing easierCategories : Syncs to sales channels for proper product placementImages : Visual reference for picking and packingPricing : All three price points (cost, wholesale, retail) for accurate reporting
Harmonization Code : Required for international shipping customsUPC/Barcode : Enables barcode scanning in warehouseWeight & Dimensions : Auto-calculates shipping costs and ratesTags : Custom organization and filtering
Next Steps: