Create manual orders in OmniOrders for phone sales, walk-in customers, and offline channels. Step-by-step guide to selecting products, customers, and shipping.
---
title: Creating Orders
description: Create manual orders in OmniOrders for phone sales, walk-in customers, and offline channels. Step-by-step guide to selecting products, customers, and shipping.
---
Creating orders manually lets you add orders from phone calls, walk-in customers, or any offline sales channel directly into OmniOrders. Every order enters the same fulfillment pipeline whether it comes from an integration or manual entry.
:::tip[Before You Start]
Have the customer's complete shipping address, contact information, and product SKUs ready before creating an order. This makes the process faster and reduces errors.
:::
## Why Create Manual Orders?
**Manual order creation lets you process sales that originate outside your integrated channels — phone orders, walk-in purchases, trade show sales, or B2B transactions. You control every detail: pricing, shipping method, fulfillment location, and whether to save as a draft or process the order immediately.**
<CardGrid>
<IconCard title="Offline Sales" icon="phone">
Process phone orders, walk-in purchases, trade show sales, or any orders that don't come through automated channels.
</IconCard>
<IconCard title="Full Control" icon="settings">
Set pricing, shipping methods, fulfillment locations, special dates, and custom instructions for each order.
</IconCard>
<IconCard title="Fill Integration Gaps" icon="puzzle">
Add orders from sales channels without direct integrations or during integration downtime.
</IconCard>
<IconCard title="Draft for Later" icon="file-text">
Save incomplete orders as drafts to finish later, perfect for quotes or orders pending payment approval.
</IconCard>
</CardGrid>
## Creating a New Order
<SupademoEmbed demoId="cmi82r6gj63pdb7b41ufmvwqg" />
<Steps>
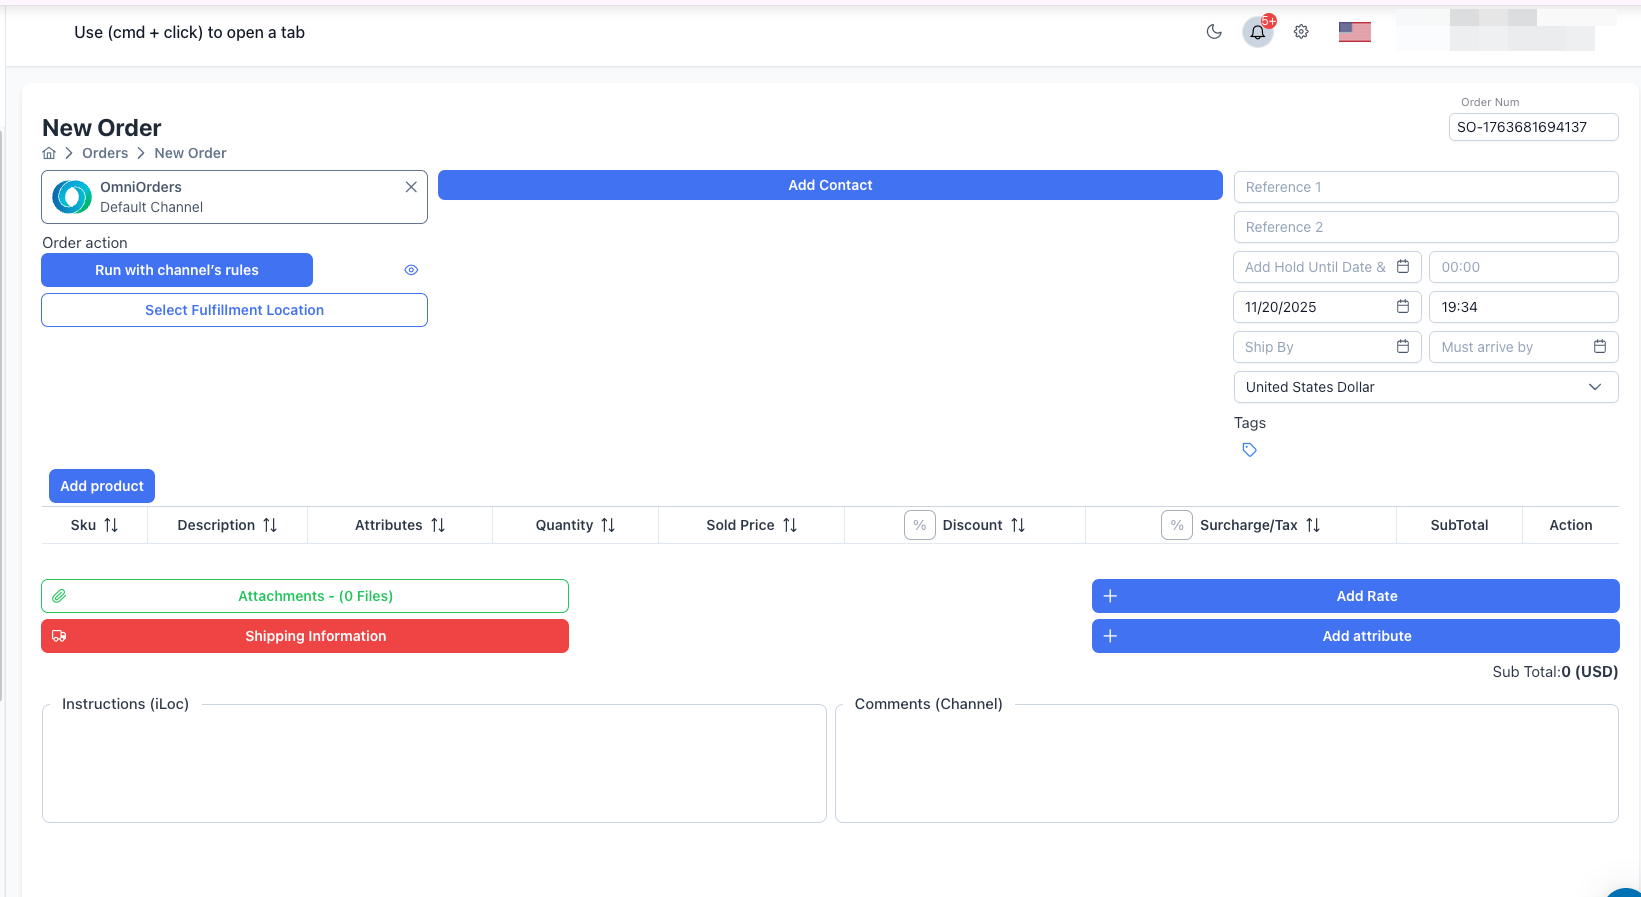
1. **Open the Create Order Form**
Click **Orders** in the main navigation, then click the **New Order** button in the top right corner.
2. **Set Order Number**
The system auto-generates an order number with format `SO-[timestamp]`. You can edit this to match your own numbering system or leave it as-is.
3. **Select Channel**
Choose which sales channel this order belongs to:
- **OmniOrders** - Default for manual orders
- **Shopify**, **Amazon**, **eBay**, etc. - If order originates from a connected channel
The channel determines which automation rules apply to routing and processing.
4. **Choose Fulfillment Method**
Decide how to route this order:
**Option 1: Run with channel's rules** (Recommended)
- Automation rules determine the fulfillment location
- Based on inventory, customer location, product type, or custom rules
- Click **Run with channel's rules** button
**Option 2: Select Fulfillment Location** (Manual)
- You choose which warehouse or 3PL handles the order
- Click **Select Fulfillment Location** button
- Pick from available locations
- Shows as "TO: [Location Name]" when selected
:::note[Automation]
Click the eye icon next to "Run with channel's rules" to view the routing rules that will apply to this order.
:::
5. **Add Customer Contact**
Click **Add Contact** to either:
- **Choose existing customer** - Search by name, email, or phone
- **Create new customer** - Click **New Contact** and fill in details
Required customer information:
- First Name and Last Name
- Email Address
- Phone Number
- Company Name (optional)
6. **Add Shipping and Billing Addresses**
After selecting a contact, fill in address details:
**Shipping Address (Required):**
- Address Line 1, 2, 3
- City
- State/Province
- Postal/Zip Code
- Country
**Billing Address (Optional):**
- Check "Same as shipping" to copy shipping address
- Or enter different billing address details
:::caution[Required Fields]
Orders cannot be saved without complete customer contact and shipping address information. Missing fields will show validation errors when you try to save.
:::
7. **Set Order Details**
Fill in additional order information:
**Reference Numbers:**
- **Reference 1** - Customer PO number, tracking reference, etc.
- **Reference 2** - Secondary reference or order source
**Important Dates:**
- **Order Date** - When customer placed the order (defaults to today)
- **Ship By** - Target shipping date
- **Must Arrive By** - Customer delivery deadline
- **Hold Until** - Delay processing until this date/time
**Order Settings:**
- **Currency** - Select currency (defaults to account currency)
- **Tags** - Add tags for organization and filtering
8. **Add Products to Order**
In the Product Data Table section, click **Add Product**:
1. Search for products by SKU or product name
2. Select one or multiple products
3. Set quantity for each product
4. Click **Add** to insert products into the order
For each product line, configure:
- **Quantity** - Number of units ordered
- **Sold Price** - Price per unit (pre-filled from product catalog)
- **Discount** - Amount or percentage off (toggle % button for percentage)
- **Surcharge/Tax** - Additional charges per unit (toggle % button for percentage)
- **Attributes** - Add custom metadata to specific line items
The **SubTotal** column calculates automatically: `(Quantity × Sold Price - Discount + Tax)`
**Total Order Value** appears at the bottom of the product table.
:::note[Product Availability]
You can only add products that exist in your product catalog. If a product is missing, create it in **Inventory** first.
:::
9. **Add Shipping Information (Optional)**
Choose shipping details:
**Option 1: Manual Entry**
- Click **Shipping Information**
- Select **Carrier** (UPS, FedEx, USPS, etc.)
- Select **Method** (Ground, 2-Day, Overnight, etc.)
**Option 2: Get Live Rates**
- Click **Add Rate** to fetch real-time shipping quotes
- Choose from available carriers and methods
- Rate automatically populates carrier and method fields
10. **Add Additional Details (Optional)**
Enhance your order with optional information:
**Attached Files:**
- Upload invoices, custom labels, packing slips, or other documents
- Click **Attachments** button to upload
**Custom Rates:**
- Add handling fees, insurance, or other charges
- Click **Add Rate** button to add rate items
**Order Attributes:**
- Add custom key-value pairs for tracking
- Click **Add attribute** button to add metadata
**Special Instructions:**
- **Instructions (iLoc)** - Notes for the fulfillment location (gift wrap, special handling, etc.)
- **Comments (Channel)** - Notes visible to the sales channel
11. **Save the Order**
Click **Save Order** button at the bottom. A dialog appears with two options:
**Save as draft**
- Saves order without processing
- Status becomes "Draft"
- Does NOT create shipment or trigger fulfillment
- Can be edited or processed later
- Perfect for quotes, pending orders, or incomplete information
**Continue**
- Processes the order immediately
- Status becomes "Open"
- Creates shipment at fulfillment location
- Triggers automation rules (if using "Run with channel's rules")
- Sends to warehouse for picking and packing
:::tip[When to Use Each Option]
Use "Save as draft" for quotes, orders awaiting payment, or when you need to verify details. Use "Continue" when the order is ready for immediate fulfillment.
:::
</Steps>
## Order Form Fields Reference
### Required Fields
| Field | Description | Validation |
|-------|-------------|------------|
| **Channel** | Sales channel source | Must be selected |
| **Customer Contact** | Name, email, phone | All contact fields required |
| **Shipping Address** | Complete delivery address | Address1, City, Postal Code, Country required |
| **Products** | Order line items | At least one product with valid quantity |
| **Order Date** | Order placement date | Cannot be empty |
| **Currency** | Pricing currency | Defaults to account currency |
### Optional Fields
| Field | Description | Use Case |
|-------|-------------|----------|
| **Order Number** | Custom identifier | Match your numbering system |
| **Reference 1 & 2** | External references | PO numbers, tracking IDs |
| **Ship By** | Target ship date | Priority or time-sensitive orders |
| **Must Arrive By** | Delivery deadline | Guaranteed delivery dates |
| **Hold Until** | Delay processing | Pre-orders, future fulfillment |
| **Billing Address** | Invoice address | When different from shipping |
| **Tags** | Categorization | Campaign, source, priority |
| **Shipping Info** | Carrier & method | Override automation |
| **Instructions** | Fulfillment notes | Gift wrap, special handling |
| **Comments** | Channel notes | Customer requests |
| **Attached Files** | Documents | Invoices, labels, customs forms |
| **Rates** | Custom charges | Handling fees, insurance |
| **Attributes** | Metadata | Custom tracking fields |
### Product Line Fields
Each product in the order has these configurable fields:
| Field | Description | Notes |
|-------|-------------|-------|
| **SKU** | Product identifier | From product catalog |
| **Description** | Product name | Auto-filled |
| **Quantity** | Units ordered | Must be > 0 |
| **Sold Price** | Price per unit | Can override catalog price |
| **Discount** | Reduction amount or % | Toggle between fixed and percentage |
| **Surcharge/Tax** | Additional charges | Toggle between fixed and percentage |
| **SubTotal** | Line total | Calculated: (Qty × Price - Discount + Tax) |
| **Attributes** | Line metadata | Product-specific custom data |
## Understanding Order Status Flow
When you save an order, it enters the order lifecycle based on your choice:
:::note[Order vs Shipment Status]
Orders have **two statuses** that work together:
- **Order Status** - Overall order state (Draft, Open, Closed, etc.)
- **Shipment Status** - Fulfillment progress (Routing, Assigned, Shipped, etc.)
Both statuses are visible in the orders list and give you a complete picture of order progress.
:::
### Draft Orders
**Order Status:** **Draft**
**Characteristics:**
- Shipment: None created
- Fulfillment: Not triggered
- Editable: Yes (all fields)
- Automation: Does not run
**Use For:**
- Orders pending customer payment
- Quotes awaiting approval
- Incomplete information
- Orders to process later
**To Process Later:**
1. Go to Orders list
2. Find the draft order
3. Click the three-dot menu
4. Select **Edit**
5. Complete any missing details
6. Save with **Continue** to process
### Processed Orders
**Order Status:** **Open** → eventually → **Closed**
**Shipment Status:** **Routing** → **Assigned** → **Shipped**
**Characteristics:**
- Shipment: Created at fulfillment location
- Fulfillment: Triggered immediately
- Automation: Runs based on channel rules
- Editable: Limited (some fields locked)
**Order Lifecycle:**
1. **Order Status: Open** - Order created and active
2. **Shipment Status: Routing** - Automation determining fulfillment location
3. **Shipment Status: Assigned** - Sent to warehouse/3PL
4. **Shipment Status: Shipped** - Order shipped to customer
5. **Order Status: Closed** - Order complete after successful delivery
:::tip[Understanding the Flow]
The **order status** stays mostly **Open** while the **shipment status** moves through Routing → Assigned → Shipped. When everything is complete, the order status changes to **Closed**.
:::
## Product Selection Tips
### Finding Products
**Search Methods:**
- Type exact SKU in search box
- Type partial SKU to see matches
- Search by product name
- Filter by product attributes
**Product Info Displayed:**
- SKU code
- Product name
- Description
- Current price
- Available inventory (if applicable)
### Adding Multiple Products
You can add multiple products at once:
1. Click **Add Product**
2. Search for first product
3. Check its checkbox
4. Search for next product
5. Check its checkbox
6. Repeat as needed
7. Click **Add** to insert all selected products
### Modifying Products
**After Adding:**
- Change quantity directly in table
- Adjust sold price if needed
- Add discount (fixed or %)
- Add tax/surcharge (fixed or %)
- Click **Attributes** to add product-specific metadata
- Click delete icon to remove from order
## 💡 Best Practices
<CardGrid>
<IconCard title="Verify Customer Data" icon="user-check">
Always select existing customers when possible to avoid duplicate records. Verify address accuracy to prevent shipping errors and delivery delays.
</IconCard>
<IconCard title="Set Accurate Dates" icon="calendar">
Enter the actual order date (when customer placed it), not the date you're entering it. This keeps your reporting and analytics accurate.
</IconCard>
<IconCard title="Use Reference Fields" icon="tag">
Fill in Reference 1 and Reference 2 to link orders to external systems, PO numbers, or other identifiers for easier tracking and reconciliation.
</IconCard>
<IconCard title="Apply Tags Consistently" icon="bookmark">
Create a tagging strategy (campaign, source, priority, etc.) and apply tags consistently. This makes filtering and reporting much easier later.
</IconCard>
<IconCard title="Double-Check Before Processing" icon="check-square">
Review products, quantities, pricing, and shipping address before clicking "Continue". Use "Save as draft" if you need more time to verify details.
</IconCard>
<IconCard title="Add Special Instructions" icon="message-square">
Use the Instructions field to communicate gift wrapping, custom packaging, fragile handling, or other special requirements to your warehouse team.
</IconCard>
</CardGrid>
## Troubleshooting
### "You should select a channel first"
**Problem**: Trying to add products or select fulfillment location before choosing a channel.
**Solution**: Select a channel from the Channel dropdown at the top of the form first. All other fields become available after channel selection.
---
### "The contact information is incomplete"
**Problem**: Missing required customer fields.
**Solution**:
1. Click **Add Contact**
2. Fill in all required fields (marked with validation errors):
- First Name, Last Name
- Email Address
- Shipping Address (Address1, City, Postal Code, Country)
3. Ensure all fields have valid data before saving
---
### "Field Required" validation errors
**Problem**: Attempting to save order with missing required fields.
**Solution**: Check for these common issues:
- Channel selected?
- At least one product added with quantity > 0?
- Order date filled?
- Customer contact complete?
- Shipping address complete?
Fields with errors display red validation messages.
---
### Product doesn't appear in search
**Problem**: Cannot find product when clicking "Add Product".
**Solution**:
1. Verify the product exists in **Inventory → Product Catalog**
2. Check spelling of SKU or product name
3. Ensure product is active (not archived)
4. Create the product first if it doesn't exist
---
### "The shipping information is incomplete"
**Problem**: Shipping carrier or method missing.
**Solution**:
- Click **Shipping Information**
- Select both **Carrier** and **Method**
- Or click **Add Rate** and choose from available options
Note: Shipping information is optional for draft orders but may be required by some fulfillment locations.
---
### Cannot edit order after saving
**Problem**: Some fields are locked or read-only after processing.
**Solution**: This is expected behavior. Once an order is processed (not draft), certain fields lock to maintain data integrity. Create a new order or contact support if major changes are needed.
---
### Order automatically routes to wrong location
**Problem**: Order assigned to unexpected fulfillment location.
**Solution**:
- If using "Run with channel's rules", check your automation rules
- Use "Select Fulfillment Location" to manually choose the warehouse
- Review routing rules in **Automation → Rules** to adjust logic
## After You Save
### Draft Orders
Draft orders appear in the orders list with **Draft** status:
- **Location**: Orders > Filter by Status = Draft
- **Next Steps**: Edit when ready to process
- **Editing**: Click order → Edit → Make changes → Save with "Continue"
- **Deleting**: Click three-dot menu → Cancel Order
### Processed Orders
Orders saved with "Continue" move through fulfillment:
- **Status Changes**: Open → Routing → Assigned → Pending Shipment → Shipped
- **Warehouse View**: Appears on warehouse dashboard for picking
- **Tracking**: Shipment created with tracking information
- **Notifications**: Triggers configured email notifications
- **Automation**: Runs all applicable automation rules
## Next Steps
Now that you've created an order, explore these features:
- **[Orders Overview](/orders/overview/)** - View and filter all orders
- **[Editing Orders](/orders/editing/)** - Modify existing orders
- **[Managing Orders](/orders/managing/)** - Take action on orders including bulk operations
- **[Order Status & Workflow](/orders/status/)** - Understanding order lifecycle
- **[Managing Products](/products/managing/)** - Manage your products
- **[Customers Overview](/customers/overview/)** - Manage customer database