Create inventory transfers in OmniOrders in a few steps. Select source, destination, and products, then submit to move stock between fulfillment locations.
---
title: Creating Transfers
description: Create inventory transfers in OmniOrders in a few steps. Select source, destination, and products, then submit to move stock between fulfillment locations.
---
Transfers let you move inventory from one fulfillment location to another. The process is simple: select where the inventory is coming from, choose where it's going, pick which products to transfer, and confirm the details.
This guide walks you through creating a transfer from start to finish.
<SupademoEmbed demoId="cmklejlxu07ec12fibdtnv81z" />
:::tip[Quick Start]
Click **Actions → Create Transfer** from the Transfers page to start. You'll complete five steps to set up your transfer.
:::
## Why Create Transfers?
**Creating a Transfer moves inventory from one of your fulfillment locations to another — rebalancing overstock, preparing for peak seasons, or getting products closer to customers. OmniOrders validates quantities against available stock and tracks every unit in transit until the receiving location confirms arrival.**
<CardGrid>
<IconCard
title="Rebalance Inventory"
icon="package-open"
bgColor="#eff6ff"
bgColorDark="rgba(59, 130, 246, 0.12)">
Move products from locations with excess stock to ones that need more. Keep your inventory balanced.
</IconCard>
<IconCard
title="Fulfill Orders Faster"
icon="truck"
bgColor="#f0fdf4"
bgColorDark="rgba(34, 197, 94, 0.12)">
Position inventory closer to customers. Ship orders from the nearest location to reduce delivery times.
</IconCard>
<IconCard
title="Prepare for Demand"
icon="calendar-check"
bgColor="#faf5ff"
bgColorDark="rgba(168, 85, 247, 0.12)">
Move stock ahead of seasonal peaks or promotions. Ensure high-demand locations are well stocked.
</IconCard>
<IconCard
title="Track Movement"
icon="map-pin"
bgColor="#f0fdfa"
bgColorDark="rgba(20, 184, 166, 0.12)">
See exactly where inventory is in transit. Monitor transfer status until items arrive.
</IconCard>
</CardGrid>
## How to Create a Transfer
Creating a transfer takes five steps. The system guides you through each one.
<SupademoEmbed demoId="cmklerumz07lj12fiur7rwckc" />
<Steps>
1. **Select Source Fulfillment Location**
Choose the fulfillment location where the inventory currently is. This is the location you're transferring FROM.
The system shows all your fulfillment locations. Pick the one that has the inventory you want to move.
Click **Continue** to move to the next step.
2. **Select Destination Fulfillment Locations**
Choose one or more fulfillment locations where you want to send the inventory. These are the locations you're transferring TO.
You can select multiple destinations if you want to split the inventory across several locations. Each destination will receive the quantities you specify in later steps.
The system asks: "Please select the locations to which would like to send the inventory that you are ordering in this transfer. This help ensure that the inventory is properly distributed and received."
Click **Continue** when you've selected all destination locations.
3. **Select SKUs and Quantities**
Choose which products (SKUs) to transfer and how many units of each.
- Browse or search for products from your inventory
- Enter the quantity you want to transfer for each SKU
- The system shows available quantities at the source location
- You cannot transfer more than what's available
If you try to transfer more than available, you'll see an error: "SKUs exceeding available quantity"
Click **Continue** to proceed to delivery site details.
4. **Assign Quantities to Delivery Sites**
If you selected multiple destination locations, this step lets you decide how much goes to each one.
For each destination, you'll specify:
- Location name
- Contact first name
- Contact last name
- Contact email
- How many units of each SKU this location receives
The system ensures all transferred quantities are assigned. Any unassigned quantities show as warnings.
Click **Continue** to preview your transfer.
5. **Preview and Confirm Transfer**
Review all transfer details before creating it:
- Source location (where inventory is leaving from)
- Destination locations (where inventory is going)
- All SKUs and quantities
- Contact information for each destination
- Total transfer value (if prices are set)
When everything looks correct, click **Continue** to see the final confirmation dialog.
</Steps>
## Final Confirmation
After reviewing your transfer, a confirmation dialog appears asking: "Would you like to save the transfer?"
You have three options:
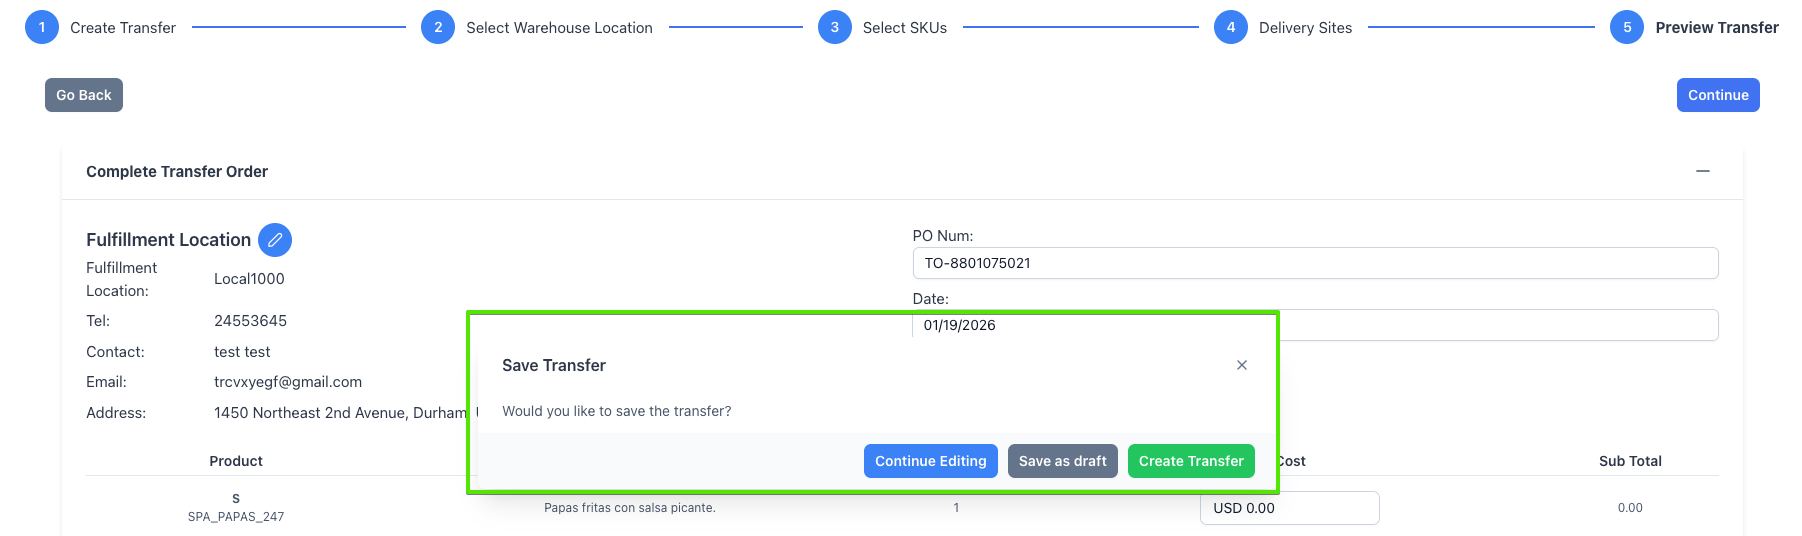
- **Continue Editing** - Go back to make changes without saving
- **Save as Draft** - Save the transfer to complete later (not yet sent)
- **Create Transfer** - Create and send the transfer immediately
:::note[What Happens Next]
When you create the transfer:
- Inventory status changes to "In Transit"
- Items are removed from source location's available stock
- Items won't show as available until received at destination
- You can track transfer status from the Transfers page
:::
## Transfer Details You Can Add
### Notes to Warehouse
Add special instructions for the warehouse handling the inventory. This might include:
- Handling requirements
- Priority level
- Special packaging needs
- Any other important information
### Cost Information
If you track costs, you can enter:
- **Unit Cost** - Cost per unit for each SKU
- System calculates total transfer value automatically
### Additional Costs
Track other costs related to the transfer:
- **Shipping** - Transportation costs
- **Taxes** - Any applicable taxes
- **Discount** - Any discounts applied
- **Other** - Miscellaneous costs
## Understanding Quantity Validation
The system prevents common mistakes:
### Cannot Transfer More Than Available
If you try to transfer 100 units but only 50 are available, you'll see: "Is unavailable the qty in this Fulfillment Location to this SKU"
**Solution**: Reduce the transfer quantity or check inventory levels at the source location.
### Must Assign All Quantities
If you're sending to multiple locations, all units must be assigned. For example, if you're transferring 100 units total, the destination quantities must add up to exactly 100.
**Solution**: Verify destination quantities add up to the total transfer amount.
## Tips for Successful Transfers
<CardGrid>
<IconCard title="Check Availability First" icon="check-circle">
Before creating a transfer, verify the source location has enough inventory. View inventory levels from the Inventory page filtered by location.
</IconCard>
<IconCard title="Use Descriptive Notes" icon="pencil">
Add warehouse notes to provide context. Explain why the transfer is happening and any special handling needed.
</IconCard>
<IconCard title="Save as Draft" icon="clock">
If you're not sure about all details, save as draft. Come back later to review and complete the transfer.
</IconCard>
<IconCard title="Double-Check Destinations" icon="map-pin">
Verify contact information for each destination. The warehouse uses this information to coordinate receipt of inventory.
</IconCard>
</CardGrid>
## Common Questions
### Can I edit a transfer after creating it?
**Transfers cannot be edited after creation. Cancel the transfer and create a new one with the correct details.**
### What if inventory arrives damaged?
**When receiving the transfer, adjust the received quantities to reflect only undamaged units. Document the damage in the receiving notes for your records.**
### How do I know when inventory arrives?
**Monitor transfer status from the Transfers page. When the destination location receives items, the transfer status and received quantities update automatically.**
### Can I cancel a transfer?
**Yes — transfers that haven't been fully received can be cancelled. Go to the Transfers page, find the transfer, and use the cancel action from its menu.**
## Troubleshooting
### "Please select a location" error
**Problem**: You clicked Continue without selecting a fulfillment location.
**Solution**: Select at least one location from the dropdown before proceeding.
### "Please select SKUs" error
**Problem**: You tried to continue without adding any products.
**Solution**: Add at least one SKU with a quantity greater than zero.
### SKU quantity validation errors
**Problem**: Transfer quantities exceed available inventory or aren't fully assigned to destinations.
**Solution**:
- Check source location inventory levels
- Reduce transfer quantities to match availability
- Ensure destination quantities add up to total transfer amount
---
**Next Steps**: [Transfers Overview](/transfers/overview/) | [Fulfillment Locations](/inventory/locations/)